Dell EMC PowerProtect DD 初始化文档
DataDomain硬件节点
1.使用串口连接DD,波特率115200
2.登录CLI界面,使用用户名sysadmin,密码为设备SN。
localhost.localdomain login:sysadmin
Password:<system_serial_number>
3.接受终端用户许可协议
Press any key then hit enter to acknowledge the receipt of EULA information
4.首次启动运行配置向导,您可以通过键入config setup手动启动CLI配置向导。
5.网络配置
Network Configuration
Configure Network at this time (yes|no) [no]:yes //确认配置网络
Use DHCP
Use DHCP for hostname, domainname, default gateway and DNS servers? (At least one interface needs to be configured using DHCP) (yes|no|?)no //不使用DHCP
Enter the hostname for this system (fully-qualified domain name)[]:dd.joyoutech.com //输入完全限定域名
Domainname
Enter your DNS domainname []:joyoutech.com //域名
Ethernet port eth0a
Enable Ethernet port ethMa (yes|no|?) [yes]:yes //启用管理端口
Use DHCP on Ethernet port ethMa (yes|no|?) [no]:no //不适用DHCP
Enter the IP address for eth0b [0.0.0.0]:192.158.100.116 //输入管理IP
Enter the netmask for eth0b [255.255.255.0]:255.255.255.0 //子网掩码
Default Gateway
Enter the default gateway IP address:192.168.100.254 //默认网关
IPV6 Default Gateway
Enter the ipv6 default gateway IP address: //留空,跳过IPv6网关
DNS Servers
Enter the DNS Server list (zero, one, two or three IP addresses):192.168.100.1 //DNS地址
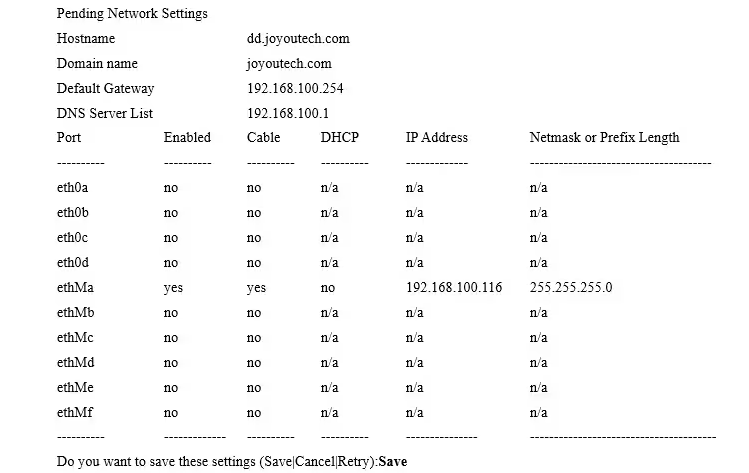
6.显示网络设置摘要,输入Save接受设置
7.其他系统参数
# config set mailserver mail.datadomain.com //设置邮件服务器
The Mail (SMTP) server is:mail.datadomain.com
# config set location "Dallas Regional Data Center Lab,5000 Apple Drive Suite #130, Dallas, Tx" //设置位置
The System Location is:Dallas Regional Data Center Lab,5000 Apple Drive Suite #130, Dallas, Tx
# ntp add timeserver 192.168.101.1 //设置NTP启用
Remote Time Servers:192.168.10.1
# config set timezone US/Central //修改时区
The Timezone name is:US/Central
*** You made a change to the timezone setting. To fully effect this change
*** (in currently running processes), you need to reboot the machine. //提示需重启生效
# system reboot //重启
The 'system reboot' command reboots the system.File access is interrupted during the reboot.
Are you sure? (yes|no|?) [no]:yes //确定
ok, proceeding.
The system is going down for reboot.
PowerEdge硬件节点
1.配置iDRAC
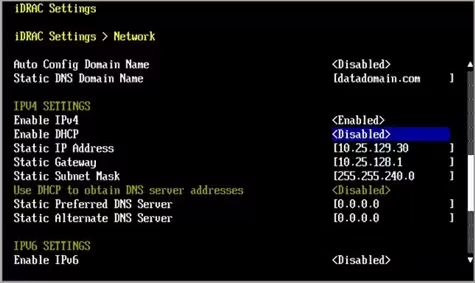
使用KVM连接VGA接口,开机按F2进入BIOS,在iDRAC Settings>Network>IPv4 Settings页面下配置IP地址、子网掩码、默认网关
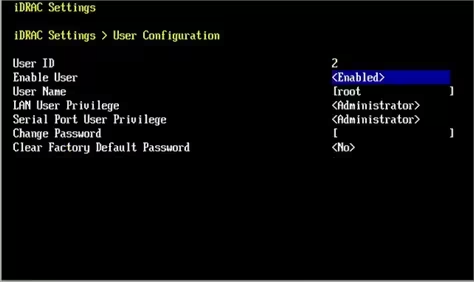
在iDRAC Settings>User Configuration页面,启动root用户,并修改root密码,默认密码为SN。
2.配置 Serial over LAN (SOL)(可选)
注意:启用SOL会禁用串行控制台。
使用浏览器登录iDRAC管理地址,用户名root,密码为设备SN
选择Configuration > BIOS Settings > Serial Communications页面,验证以下值:
Serial Communication: Auto
Serial Port Address: Serial Device1=COM2, Serial Device2=COM1
External Serial Connector: Serial Device 2
Failsafe Baud Rate: 115200
Remote Terminal Type: VT100/VT220
Redirection After Boot: Enabled
点击Apply保存配置
选择iDRAC Settings > Connectivity > Serial Over LAN页面,设置以下值:
Enable Serial Over Lan: Enable
Baud Rate: 115.2 kbps
Channel Privilege Level Limit: Administrator
Redirect Enable: Enable
Escape Key: ^\ (Ctrl + \)
点击Apply保存配置
选择iDRAC Settings > Services页面,设置以下值:
选择 Enabled for SSH。
验证“Port Number”是否设置为 22
点击Apply保存配置
选择Configuration > BIOS Settings > Serial Communications页面,单击 Apply and Reboot。
3.串口连接设备
1.使用串口连接DD,波特率115200。
2.连接iDRAC接口,运行ssh <iDRAC-IP-address> -l <iDRAC-username>输入密码登录,运行console com2命令启动控制台。
4.初始化配置
初始化配置和DataDomain硬件步骤相同。
后续步骤
1.添加许可证、配置其他备份网络、创建文件系统等操作。
2.使用VTL、Ddboost、或文件系统提供给备份软件。